Fitting the muslin for the Ralph Rucci coat

So, I obviously need an FBA here. Those are some major wrinkles coming from the sides and armscye.

010

002

I’m wearing the muslin over a fairly bulky sweater, but that was deliberate. I wanted to see how the jacket would close over a thicker layer. It’s fine through the waist and hips, not so good over the bust. One of the great things about a fitting muslin is that you can draw right on it. I used a green highlighter to mark the two deepest wrinkles, which is where the FBA will have to be made. If you look near the seam on the right, it’s easier to see the markings.

016

This means it’s back to the pellon tracing I made of this pattern piece. I’ll add a dart to that area, remove this panel from the muslin, and replace it with the darted/FBA new piece. Also, I think the jacket is too long overall, too, so I’m going to shorten the sleeves and hem while I’m at it. I’d like it to hit right at the knee, and now, it’s probably two inches below that point. It occurs to me that if I add some hidden closures below the waist, this piece can pull double duty as a coatdress of sorts. Debating that now. I think it would be a cool dress, but I don’t know if I would wear it as a dress, you know?

Theresa
A quick tip for sewing curved seams

I’m working on my fitting muslin for the Vogue 1419 Ralph Rucci coat — this beauty, remember?

V1419-sewalong-badge-250px

Anyway, I’m doing a fitting muslin rather than a construction muslin — that is, the purpose of my muslin is to work out any fitting issues rather than any construction issues. On the sew-along blog, they advocate making a construction muslin to practice all the construction techniques on this masterpiece pattern, and now that I’m actually looking at the instructions, I can see why. There are loads of techniques in this coat that we don’t often use in run-of-the-mill garment construction.

I have to give Vogue Patterns a lot of credit for these instructions, though. They throw in lots of small details to make the process easier, including a note to “clip seams if necessary” in different places. Here’s one of the place that clipping seams is necessary. Here we join the side panel to the front panel along the side seam.

002

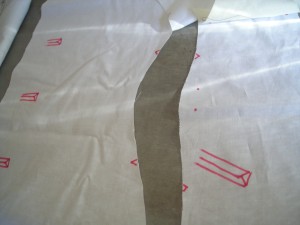
Here, both pieces are face up — right sides showing. You can see the red notches that have to match at the seam lines. The top red notches look about parallel, but the bottom red notches are staggered by at least an inch. The curves on the raw edge are pretty smooth and fit together almost like a jigsaw puzzle. But look what happens when you put the right sides together to make that seam. I’m just going to flip the piece on the right on top of the left side piece — pay attention to the two small red dots between the notches, which will help you distinguish between these two muslin pieces.

003

Those curves don’t line up so smoothly anymore. It becomes tricky to sew and tricky to keep the seam smooth there. The solution is clipping the seam. That would be the bottom seam — the curved piece to the right, the one without the two red dots. I always confuse the terms complex and compound, so forgive me for not being able to use to proper terminology here. But that curve on the right piece, without the dots, will feel tight if you try to pull it into a straight line. Frequent (1″ or less) clips into the seam allowance will let the piece stretch a bit so that you can match it to the other curve more easily.

001

Just make sure you don’t clip through more than the seam allowance. You don’t even have to clip all the way to the seam line, as that picture shows. I find a notch of around 3/8″ is usually enough, but on particularly tight curves, deeper and more frequent clips might be necessary. And as you can see in this photo, I only clipped one of the two pieces. The other was fine as it was.

In any case, once those clips are made, the notches are easier to match and the whole piece fits together just like a perfect jigsaw puzzle again. Just thought I’d mention this because we don’t always see the “clip where necessary” instruction in patterns, but we still might have to know when to do it. Curves, baby. It’s all about the curves.

Theresa

How to Cut the Muslin for the Ralph Rucci Coat

V1419-sewalong-badge-250px

The first step in the Ralph Rucci coat sew-along is cutting out the muslin. Here is a tried and true method (tried by yours truly!) to cut the muslin.

Step One.

Take pattern tissue from envelope. Stare in befuddlement at tissue while trying to see where one piece begins and the other ends. See animals in the shapes as if you are cloud-busting.

002

Oh no! This giant crab claw is about to pinch the label on my cutting mat!

Step two.

Amuse yourself by trying to guess from the shape alone what the piece actually is. No fair peeking at the printing on the tissue!

001

This is a sleeve. I KNOW, RIGHT?

Step Three.

Realize that no matter how long you sew, you will never be able to see garments quite the way Ralph Rucci, Certified International Genius, sees them. Unfair!

Step Four.

Think about all the other garments in his atelier that likely have seams in batshit crazy places. Wonder how hard it would be to break into the atelier to examine these deliciously inventive garments.

Step Five.

Remember that you were born without the criminal gene and could never actually break into anyplace, no matter how gorgeous the clothing. Unfair!

Step Six.

If only there were such a thing as a cloak of invisibility. OMG. He’s probably at work making one in his atelier right now. If anyone can make a cloak of invisibility, it’s this guy.

Step Seven.

Yes, do some more cutting and marking, and trust that the pieces will somehow fit together.

puzzlefitStep Eight.

Double, triple, and quadruple check that you have cut all the pieces you need. Use the numbers on the pattern pieces to arrange and count. It’s not as if you can just glance them over and see front, back, sleeve, collar, etc., in the ordinary way.

Step Nine.

Check again, and this time, try to guess which edges will be sewn to which other edges in which order. Go ahead, guess. It’s fun to play a game with so many possibilities.

Step Ten.

Spend the rest of the day singing this.

Cheerleaderish hand-clapping optional

(I can’t even tell you how much fun I’m having with this pattern, and I still haven’t sewn a stitch. This will be the best coat ever.)

Theresa

An Announcement and a Finished Skirt

First, the announcement.

::drumroll::

I’ve decided to participate in the Ralph Rucci Vogue 1419 coat sew-along sponsored by the McCall blog.

::cymbal crash::

V1419-sewalong-badge-250px

Is that coat gorgeous or is that coat gorgeous? I’ve been a fan of Ralph Rucci from early days. He’s a man of ideas (“too many ideas” is a common criticism, in fact), he’s out of the Halston atelier (about as good a pedigree as any American designer can hope for), and he uses really interesting techniques to make his clothes. In this case, he’s cutting the coat pieces very creatively, adding some cool topstitching, and using a stiff-ish fabric to give the garment extra shape. Here, look at the line drawing, and you’ll see what I mean.

Rucci coat line drawing

I can’t wait to sew this. I fell into a swoon the second I laid eyes on this pattern, and it seemed too good to be true when the McCall blog announced the sew-along for this coat. This week, we’re cutting the muslin and I think we’re supposed to start piecing it, but I’m already behind because a) my fabric had to be ordered and apparently is being shipped by ornery pack mule, and b) I have to make my Halloween costume first. More on that later.

So that’s the announcement. I haven’t posted a finished sewn item in a while because I’ve been cranking on that secret test knit (which I can’t show until the designer releases the pattern, alas). But I finished the test knit, which allowed me back into the sewing room, which meant I finally had time to finish this skirt.

022

This is a lighter-than-air cotton lawn, and I look forward to wearing it when warmer weather returns. In the meantime, let me encourage you to check out the print pattern placement on that waistband. Blow up the photo if you have to. I’m rather proud of that detail. The pattern placement for these seams ended up perfect thanks to a cutting technique my grandmother taught me (blogged here).  Check out this seam.

001

The straight part of the side seam — not bad, eh?

005 edit

The hip curves disrupt the perfection of the pattern match, but that’s still pretty good

I’m glad to have that done, and I’m especially glad to be back in my sewing room. I missed it! I do love knitting, but I’m pretty faithless and want to knit, sew, and shop my way into a great wardrobe. This skirt (McCall’s 6608) is a good addition to the summer skirt collection.