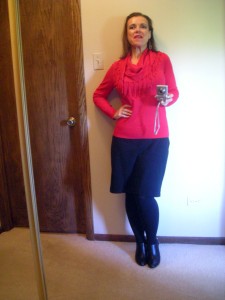
Okay, so here’s the new skirt

Nothing special — I just happened to wear the new skirt yesterday and thought I would post a photo to replace the hanger shot from last week. I love the way this skirt wears and feels, but it needs a lining or a slip. Despite being a smoother-than-average cotton ribbing, it kept sticking to my tights.

006

I bought the sweater last week at Carson’s. They’re having the Goodwill sale now, and believe me, I have clothes to donate and trade for discount coupons. This sweater in red was just interesting enough to come home with me — plain enough for everyday wear, but that fringed cowl elevates it from being just another sweater. Sweaters and tops are a fairly safe purchase right now because I think I’m about as small as I’m going to get up there. With only eight pounds left to lose, and with my hips and legs still fairly, um, generous in proportion to the rest of me, I suspect most of the last eight pounds will come from this hips down. My mouth to god’s ears, right?

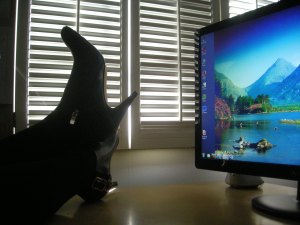
I also bought these great Vince Camuto booties last week. I think Vince Camuto is about the most interesting label in the mid-range department stores these days. He’s sharp and urban and sleek, and he’s never dull or basic. I like to put a bit of pizzazz into shoes, bags, jewelry, and other accessories because it’s an easy way to change the overall look of a simple garment, and I think these boots with black tights do the job here, adding a whiff of a city vibe. Imagine this skirt instead with a close-fitting tee, bare legs, and kitten heels, and it’s easy to see how the accessories make a big difference.

012

Yes, I know, the fashion magazines have taken to calling this style shoeties instead of booties, but really. I have my limits. Shoeties is an awful word and shall never again be typed by my fingers. But I do still really like this pair. They’re perfect for fall, the silver buckles and zips add a little shine, and the heel height is super comfy. Plus they’re right on trend — I think all I really need now are knee boots and snow boots, and I’ll be in pretty good shape for footwear heading into the cold dark months.

Do you have your eyes on any particular items to freshen up your fall wardrobe? What will you add to your closet soon?

Theresa

A simple waistband alteration on paper

The other day, when I blogged about my 90-minute skirt, I mentioned that I removed four inches from the waist in the pattern. This alteration was made before I cut the fabric, an adjustment to the pattern itself. I find paper alterations to be easy and effective. They don’t take a lot of time and they make the final fitting easier. Here’s how I did this particular adjustment.

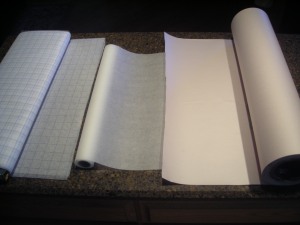
All you need are a tape measure, paper, a drafting ruler, and a dose of self-awareness. I have several different kinds of paper I keep on hand.
006

On the left is a bolt of Pellon (a brand of non-woven interfacing), available at any sewing store for around $3 a yard. I use my 40% JoAnn coupons on this stuff, buying the biggest bolt I can find so that I always have plenty. The pre-printed blue grid lines are one inch square, and that fact makes this stuff a worthy investment. It’s sheer enough to lay over the pattern tissue and trace, and if you know you’re moving thus-and-so line an inch, that inch is already marked on the Pellon. (Online sources: Amazon, fabric.com, ShopPellon.com) You can also sew this stuff, so it can double as a muslin for tricky to fit items like boned corsets. You can write on it with a Sharpie or other marking tool, but it is slightly prone to bleed-through, so mind what you have under it.

In the middle is a roll of plain paper. It’s slightly sheer, resists bleeding, and is about 18″ wide — I look for rolls in the 18-24″ width range, which seem to work best. This particular roll is from Staples, but this sort of paper is available at any office supply store. Look in the art paper area for banner rolls, but avoid Kraft paper, which is opaque. Something slightly sheer works better. I lay this paper right over the pattern tissue and trace the size I want, and then alter on paper from there.

On the right is an end roll of newspaper. A friend’s husband works in periodical publishing and he provided this, but you can often get these just by stopping into the local news office and asking. They ordinarily give away the end rolls if they have any handy. I know area school teachers who use this stuff for all sorts of classroom decorations, are projects, disposable table covers, and so on. It’s opaque, so I tend to use it to make copies of existing pattern piece — something I’ve done pretty regularly as I’ve lost weight and needed to adjust my slopers. I also use this when I decide I would like to take an existing t-shirt pattern and make it into a tunic or dress, for example — bigger alterations to existing patterns where I want to preserve the original pattern.

So, first I measure the pattern tissue at certain key points — in this case, the waistline, but I also measured hips. On most commercial patterns, the hip line will be 9″ below the waist line, so even if it is not marked, you can still estimate where the hip will be. (In my case, I measure the hip around 7-8″ below the waist because I am petite.) In this case, the hip was a good measurement for my body, but the waist was pretty big.

001

The smallest waist measurement for this particular skirt back piece was 9.5″. This piece is cut on the fold, as is the front piece. So, we subtract the 5/8″ at the seam allowance from the 9.5″ (9.5 – 0.625 = 8.875) and then double the answer because this piece is cut on the fold (8.875 x 2 = 17.75). The finished back piece will thus measure 17.75″ across the waist. The front piece was identical, meaning the finished waist would have measure 35.5″ wide.

Yikes.

This is where a bit of self-awareness comes in, but first we have to talk about ease. “Ease” is the word we use to describe the difference between body measurements and garment measurements. Positive ease means that the garment is larger than the body. Negative ease means that the garment is smaller than the body (often found in knitted garments). Wearing ease is the standard amount of positive ease that will make a garment fit comfortably at key measurement points, such as waist and bust — the measurements printed on the pattern envelope are places where ease is measured routinely. Then there is design ease, which is what the designer adds or subtracts to make the garment look a certain way. Cigarette pants have minimal design ease through the legs, and palazzo pants have a ton of design ease in the same place, which is why the two kinds of pants look so different. Also, woven fabrics will need more ease than knitted garments because knitted garments will stretch and move with the body in ways that woven fabrics will not.

So. I know that for me, my waist measurement is just a notch over 29″ right now. And I know that with an elastic waistband, I measure the elastic piece to have an inch of negative ease, so about 28″ once it is lapped and sewn. This is the self-awareness part — I know that anything bigger than that, in an elastic waistband, will feel droopy to me and I’ll spend the day tugging on my waistband. The waist on that pattern measures to 35.5″, and I would want to use elastic to draw in 7.5″ of that, which seemed like a lot to me. I don’t like the way a very gathered waist looks on my body — dirndls are just godawful hideous on me these days. So I knew I wanted to remove some of that excess, and I started by marking a point 1″ in on the side seams at the waist on the pattern piece. Then I used my drafting ruler to draw a new curve from that point to the hip.
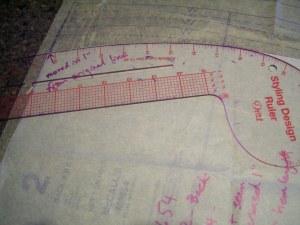
005

I also marked the alteration on the pattern piece, only because I know from experience that I can never remember what I did.
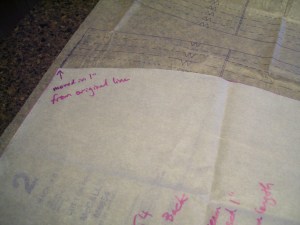
002

And that’s it. That 1″ adjustment on the front and back pieces removed 4″ from the waist, reducing it from 35.5″ finished to 31.5″ finished measure. I still used the 28″ waistband elastic finished measurement, so that meant the waistband was gathered slightly but not much. I also trimmed a bit off the waistband pattern piece, which was a plain rectangle with no waist shaping, so this meant simply hacking off four inches there, too, without worrying about waistband shaping.

This particular alteration is among the easiest to make, and I make it as a matter of routine on my skirt and pant waistbands.

Theresa
A Tale of Two Skirt Cuttings

In between sessions working on a test knit, I’ve been doing some cutting. I tend to do my project steps in batches — a lot of cutting one day, a lot of stitching, then a lot of pressing. When I’m stitching, I like to choose several projects that all use the same color thread and sew them all at once. This allows me to sit at the machine for a longer stretch and sew more seams at once before switching to the pressing board. I find it an efficient way to work.

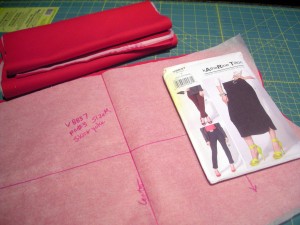
So right now, I’m cutting. I started with two skirts. I started with a heavy cotton ponte knit from Mood Fabrics for a Katherine Tilton Vogue 8837 skirt pattern. This is a lovely heavy ponte with minimal stretch, a smooth hand, and some textural interest in the surface. (Some of you might recall, I blogged about it when it first arrived from Mood.) I’ve hunted their website for this fabric in other colors, but I cannot find it. Too bad, because I have enough of it left over to work a color-blocked dress, and it would be perfect.

008

It was the best of fabrics…

You can see in the pattern envelope photo that this skirt has a shirt-tail hem. That, plus the topstitching and shaped waistband, were what attracted me to this pattern. However, the skirt length is 33″, which is almost maxi length on my 5’3″ body. So I shortened it eight inches. I wanted it to hit just below the knee at the bottom hem and to reveal my knee through the shaped sides. Cutting this fabric was slightly challenging because it is heavy weight. It tended to fold between my shear blades rather than cutting, and my rotary cutter couldn’t always make it through both thicknesses. So I used the rotary cutter twice on each cut, then used the shears to clean up any bits the rotary blade couldn’t quite manage. It wasn’t difficult, and it didn’t change my opinion of the fabric. It is a lovely fabric.

I wish the same could be said for the other skirt fabric to become view A of McCall’s 5523, a straight skirt with some back hem detailing, in this case, an inset flounce.. This one is a wool crepe that shreds along cut edges like you wouldn’t believe. Check this out — this is what was on my cutting mat after cutting one single measly line.

004

It was the worst of fabrics…

Can you see all that debris? The fabric was disintegrating with every touch. I paid a lot of money for it, too, which irritates me now that I see how it is behaving. I bought it from a sewing expo vendor that I won’t name, but if you’ve ever been subjected to high-pressure sales tactics from an international garment fabric vendor at a traveling sewing expo, you’ll know exactly the vendor I mean. I’ve bought some linen from them in the past, and it was a very high-grade fabric. But this stuff is anything but high-grade. I’m going to have to very, very carefully overcast every raw edge before I try to do any real sewing on this project. Otherwise, the fabric is likely to dissolve along the seam lines as I stitch it. Really disappointed in this fabric.

What makes it a little more annoying is that I bought it to match a silk crepe I bought at Fishman’s. It’s a really lovely crepe, and I wanted to match the dark gray in it, so I took a swatch to the sewing expo and hunted for a nice wool to make this skirt. The man in that booth talked me into this shade of dark blue instead of a gray — none of their grays were a good match, and he wasn’t about to let me leave his booth without spending money. He kept moving the bolt and my swatch under a different light and insisting that they matched — well, they did match, but only when they were under that particular light. Look at them together now in normal daylight with a bit of can lighting.

006

It’s not dreadful, but one is clearly gray and the other is clearly blue. I’m debating whether I can wear these together. It’s pretty close, just not quite right.

What do you guys think? Close enough? Or not?

Theresa

Inspired by Ungaro

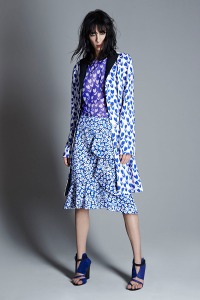
I pay attention to runway fashion shows because it’s a great source of inspiration. Resort 2015 wrapped up recently, and I’ve made a couple of items inspired by pieces I saw there. The first I’ll show you came from Emmanuel Ungaro’s collection (photo courtesy of Vogue.com).

emanuel-ungaro-resort-2015-daisy-skirt I noticed two things right away about this skirt. First,the skirt is not a mini and it has a flounce at the knee. I just happen to have a pattern like that, and I think flounced skirts are a good summer option, a little casual, a little playful. So right away, I started thinking about a riff on this skirt.

The second thing I noticed was the print — white daisies on a blue background. Fausto Puglisi, the new Ungaro designer, also used a similar print in black daisies on a white background. He’s also continuing the Ungaro tradition of mixed prints, which is not something I wear but it intrigues me. Here is some of the black daisy print.

emanuel-ungaro-resort-2015-runway-black daisies Mixed with zebra print — there was a lot of animal and floral mixing in this set. But I really liked the mood of the daisy print, so I made a flounced skirt in the spirit of the flounced skirt above, but in the black and white palette.

003 I didn’t have enough fabric to add a waterfall flounce down the front, but the hem is flounced and the length is just below the knee. It’s a lightweight cotton, so I underlined it with some plain white cotton shirting that I keep in my stash for just such needs. I use Simplicity 1807 as my base pattern, but I modified it.  I started with view A, the shorter view, and I removed three inches at the waistband seam. Then I added four darts, two front and two back, to taper the hip area to the waistband. This removed some of the extra fullness at the hips but left enough for the elastic and drawstring waistband to gather slightly. This also shortened the skirt without requiring me to redraft the flounce — this waist modification was definitely easier than redrafting the flounce would have been. The flounce came from view B-C (the midi lengths), and I did have to remove about 4″ in width to fit this flounce to the view A knee-length hem, but that did not compromise the shape of the flounce. I ended up with a shape that approximates the inspiration piece but is not an exact clone. I’m happy with it.

My Sewing Pattern Review can be found here.


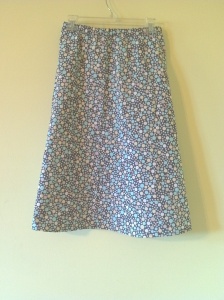
Polka dots!

How can anyone not like polka dots? They’re cheerful, casual, and bubbly. Some prints are distracting, but polka dots tend to scan a little softer on the eyes. So when I saw this lightweight cotton in my perennial favorite, gray, covered in all these pretty polka dots, I had to have a bit of yardage for a skirt. This one was on clearance at QuiltFabric.com locally, and I do like a light summer skirt made in a fun quilt print.


skirt gray polka dot I used Simplicity 1807, view C, but I omitted the drawstring for the waistband and the flounce for the hem. This is a great pattern that yields fast, easy, reliable results, the kind of pattern you can use over and over again. I’m nearly finished with another variation on this same pattern and will post that one in a few days.

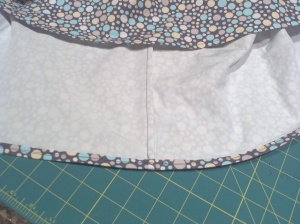
Because this fabric was lightweight and might have lacked a little body, I decided to interline it. I used to always use bleached muslin for interlinings, but when I prewashed the last two lengths in my stash, neither help up well. I don’t know what’s going on in the world of muslin lately, but these were both of very poor quality. Anyone know where to find good muslin that’s sturdier than tissue in the washer?

So I ended up using a length of white cotton shirting from Fishman’s for the interlining. My original plan for this shirting was to make a nightgown, but after deducting some for the skirt interlining, it will now be used to make a shirt. Using a shirting fabric to make a shirt? I guess sometimes I do play by the rules, after all.

skirt gray polka dot interlining and seamsI used a water soluble spray glue to adhere the layers together, and then French seamed the side seams. I’m a sucker for a French seam. I just love them and use them wherever possible. In this case, because the French seams plus the double layer of fabric added some complication to the hem area, and because this is a super casual skirt in the first place, I decided to use a sewn hem. I toyed with the idea of doing a blind him, but by this point, the spray basting was losing its grip and the layers were beginning to slide around on each other. And I’m just not all that into a machine blind hem, anyway, and the thought of trying to hand hem those sliding layers — yeah. A sewn hem is just fine. It’s casual, but it works. See?

skirt gray polka dot hem Here’s a close-up of the sewn hem, basically just machine rolled with both layers together.

I used elastic in the waistband, but no drawstring, only because I ran out of fabric and couldn’t cut the pieces for the string. I looked for ribbon at several shops, including Soutache, a store that really sparks my creativity. She carries amazing buttons and ribbons, but this time, she didn’t have a simple grosgrain in the color I wanted. So, no drawstring, which is just fine.

This is a skirt to be worn with simple tees and tanks, except I did stumble on this ivory lace tee at an area thrift store that repeats the circle motif. Love it!

skirt gray polka dot lace tee So I have a feeling I will almost always wear this lace tee with this skirt, because it’s just too perfect. I like looking pulled together even when I’ve being casual, and this just works.

My review on Sewing Pattern Reviews is here.

Theresa


An empty wardrobe. Literally.

Well, almost literally.

Here’s the story. I developed a thyroid condition and gained a lot of weight. A lot. I was up to a size 22 and hating myself for it, but there was little I could do except undergo treatment and hope for better times ahead. Those times are here now. I’m currently in a size 8, on my way to a 6 again — only 11 pounds to go until I am back to my pre-illness weight, and I can’t wait to reach goal. It’s so close now. I’ve been working every day for almost a full year now to reach this goal. Working. It has been hard, but worth every bit of effort.

Every morning, when I weigh in, I make a promise to myself that I will do everything I can that day to give myself a healthy body. Every day, when I get dressed, I think of the wardrobe I will have when I am back where I belong. These are powerful motivators for me, and they help me stay committed to the process.

My clothes have been falling off my shrinking body since late fall, but I’ve held off doing much about it. I’ve bought jeans to wear for everyday — one pair at a time, and I wear them until I’m in danger of stepping out of them as I walk. I’ve bought workout clothes on the way down, too, because the last thing I need is to drop trou on the treadmill, though I look for pants with drawstring waists so I can get more mileage out of them. Other than that and some undergarments, I’ve held off on buying many clothes as I transitioned back to my normal weight. My goal has always been the “after” wardrobe rather than the “during” wardrobe.

When you find yourself joking to your friends, “Even my belt is too big to hold my pants up,” it’s time for new clothes.  When you reach the point that all of your pants and skirts are too big to stay up — when you get tangled in your nightgown because it is more like another sheet than a garment — when your shirts are so broad that they slide off your shoulders — that’s when it’s time to recognize that you need new clothes.

So I packed up my entire wardrobe and took it to the local Goodwill. It took four trips with a packed car to shift all that stuff to the donation center. It was scary because it felt like stripping myself bare and making myself vulnerable. And it was exhilarating because I felt unburdened and ready for something new. I chose to let go of the fear and hold onto the excitement. The excitement will serve me better.

I did keep a couple of things back from the donation, but hardly any. I’m an avid knitter, and though I donated several handknit sweaters, I couldn’t bring myself to part with a couple of them. (Starmore patterns! Knitters will understand.) I kept the cashmere sweaters from Nordstrom’s. I don’t care if they are big. It’s cashmere. I had three cashmere sweaters, and even if I only ever wear them around the house, I’ll still love wearing them.

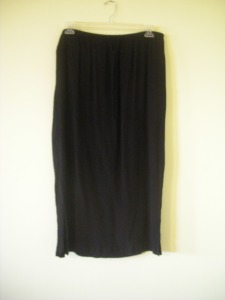
And I kept this skirt.

001I know it doesn’t look like much. That’s because it isn’t. It’s a cheap store-brand maxiskirt in a crinkled rayon that I bought for a funeral some time ago. I never would have bought it except that I really needed appropriate attire for that funeral, and it was cheap. And I got what I paid for. So this is just to say, I’ve never loved this skirt, but it has one great advantage. It has a drawstring waist, and that crinkle rayon contracts quite a lot in the dryer, so I can yank the strings and wear the thing. It’s big, but it’s do-able.

I look forward to donating this skirt. I plan to do it the very same day I reach my goal weight, which should be some time in the fall.

Now, with an empty closet, empty dresser drawers, empty shelves, I am starting the rebuilding process. I will knit, sew, and shop my way into a better look. I want to be smart about it, but I plan to have fun, because let’s face it, this is a really fun problem to solve. Most of this blog will be about the sewing and knitting, but I’ll also talk about the things I buy rather than make. Why leave that out? It’s all part of the process.

Theresa