Sunday status report

This week has been hectic, but I’ve made some bits of progress on a few projects.

I finished these footies. Not very exciting, but they’re done!  This is Another Crafty Girl sock yarn, and I love, love, love its squishy soft sproinginess. Really delicious stuff. I usually keep a pair of socks-in-progress in a little knitting bag in my purse, but I haven’t reloaded since finishing this pair of footies a couple of days ago. I have to remember to do that before tomorrow, when I will be spending a bit of time in a waiting room and certainly clicking away on new footies.

002


I’m past the halfway point — actually, at about the 2/3 mark — on the secret test knit. Can you guess what this will be? The construction is unexpected, and of course, the lace stitch work is camouflaging the actual shape and dimensions here. I’m pretty excited about this project, though. It’s going to be pretty cool when it’s done.

001


And, because I’ve been using plastic grocery sacks as project bags lately — oh, the horror! — I decided to whip out a stack of new project bags. These are folded so I could get them all into the picture. The three shoe print bags on the left will all be very large bags, large enough for coats and jackets. They’re folded in quarters here. The others will be standard shirt/sweater size, and are only folded in half, so this gives you a sense of their size. I have ribbon for the ones on the right (shown, the gray iridescent stuff) and for the shoe print, but not for the ones in the middle.

002


Finally, I have just barely started the Missoni tunic dress thingie. Just a bit of seaming, hardly even worth mentioning. My main focus has been on finishing the test knit because I have a deadline for that. Sewing is a little slow as a result.

004


I’m nearly done with a maxi skirt, too, but have been stymied by a complete lack of ivory lace hem tape in any of the area sewing stores. I can’t finish the hem without it. This is a very light, almost weightless voile, and I don’t want to weight the hem. So fusible and lots of stitching lines won’t work. I need to attach the lightweight lace tape and hand tack it, but that won’t be happening until stores restock the Wright’s display.

What are you working on now?

Theresa

Okay, so here’s the new skirt

Nothing special — I just happened to wear the new skirt yesterday and thought I would post a photo to replace the hanger shot from last week. I love the way this skirt wears and feels, but it needs a lining or a slip. Despite being a smoother-than-average cotton ribbing, it kept sticking to my tights.

006

I bought the sweater last week at Carson’s. They’re having the Goodwill sale now, and believe me, I have clothes to donate and trade for discount coupons. This sweater in red was just interesting enough to come home with me — plain enough for everyday wear, but that fringed cowl elevates it from being just another sweater. Sweaters and tops are a fairly safe purchase right now because I think I’m about as small as I’m going to get up there. With only eight pounds left to lose, and with my hips and legs still fairly, um, generous in proportion to the rest of me, I suspect most of the last eight pounds will come from this hips down. My mouth to god’s ears, right?

I also bought these great Vince Camuto booties last week. I think Vince Camuto is about the most interesting label in the mid-range department stores these days. He’s sharp and urban and sleek, and he’s never dull or basic. I like to put a bit of pizzazz into shoes, bags, jewelry, and other accessories because it’s an easy way to change the overall look of a simple garment, and I think these boots with black tights do the job here, adding a whiff of a city vibe. Imagine this skirt instead with a close-fitting tee, bare legs, and kitten heels, and it’s easy to see how the accessories make a big difference.

012

Yes, I know, the fashion magazines have taken to calling this style shoeties instead of booties, but really. I have my limits. Shoeties is an awful word and shall never again be typed by my fingers. But I do still really like this pair. They’re perfect for fall, the silver buckles and zips add a little shine, and the heel height is super comfy. Plus they’re right on trend — I think all I really need now are knee boots and snow boots, and I’ll be in pretty good shape for footwear heading into the cold dark months.

Do you have your eyes on any particular items to freshen up your fall wardrobe? What will you add to your closet soon?

Theresa

In which a trip to the Art Institute yields a pair of pajama pants

I am fortunate enough to live a short train hop from the Art Institute of Chicago, one of the world’s truly great museums. I take advantage of this fact a couple of times a year. When I was in my moody, hormonal teenaged phase, in fact, the museum was an escape hatch for me. Hop the train, flash my student ID and museum membership card, and I could spend an afternoon reminding myself of all the beauty in the world. It was soothing, and it was wordless — an important attribute of any escape for a writer.

Not too long ago, there was a pretty painting in the modern wing that, of course, I can’t find online anywhere. It looked something like this, except all in shades of green.

green circles

Use your imagination and see green

Naturally, I can’t remember the name of the artist or painting, either. In any case, I liked the painting quite a lot, enough so that when I saw its shrunken-scale near-clone printed on fabric at The Needle Shop, I bought a length in memory of the painting. I didn’t know what I would do with it, but I really liked the print because it reminded me of the painting.

It is now my third pair of pajama pants made from the same McCall’s pattern. I realize the run of pajama pants lately is a bit dull, but I’m almost done with them. I’m stopping at four. Three are finished now, and the fourth is cut and awaiting sewing time. These are good things to sew right now because I can make them in my goal-weight size, and I can wear them both now and later. They can be baggier later and still serve their purpose.

003

Pair #3 of 4

After the pajama pants are done, I’ll whip up a couple of nightshirts and robes, and that should take care of the lounge wear and night wear for now.

Do you find inspiration for sewing projects in places like museums?

Theresa

A simple waistband alteration on paper

The other day, when I blogged about my 90-minute skirt, I mentioned that I removed four inches from the waist in the pattern. This alteration was made before I cut the fabric, an adjustment to the pattern itself. I find paper alterations to be easy and effective. They don’t take a lot of time and they make the final fitting easier. Here’s how I did this particular adjustment.

All you need are a tape measure, paper, a drafting ruler, and a dose of self-awareness. I have several different kinds of paper I keep on hand.

006

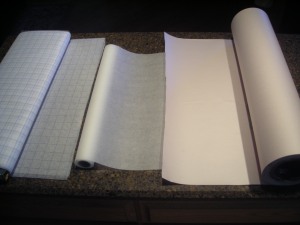
On the left is a bolt of Pellon (a brand of non-woven interfacing), available at any sewing store for around $3 a yard. I use my 40% JoAnn coupons on this stuff, buying the biggest bolt I can find so that I always have plenty. The pre-printed blue grid lines are one inch square, and that fact makes this stuff a worthy investment. It’s sheer enough to lay over the pattern tissue and trace, and if you know you’re moving thus-and-so line an inch, that inch is already marked on the Pellon. (Online sources: Amazon, fabric.com, ShopPellon.com) You can also sew this stuff, so it can double as a muslin for tricky to fit items like boned corsets. You can write on it with a Sharpie or other marking tool, but it is slightly prone to bleed-through, so mind what you have under it.

In the middle is a roll of plain paper. It’s slightly sheer, resists bleeding, and is about 18″ wide — I look for rolls in the 18-24″ width range, which seem to work best. This particular roll is from Staples, but this sort of paper is available at any office supply store. Look in the art paper area for banner rolls, but avoid Kraft paper, which is opaque. Something slightly sheer works better. I lay this paper right over the pattern tissue and trace the size I want, and then alter on paper from there.

On the right is an end roll of newspaper. A friend’s husband works in periodical publishing and he provided this, but you can often get these just by stopping into the local news office and asking. They ordinarily give away the end rolls if they have any handy. I know area school teachers who use this stuff for all sorts of classroom decorations, are projects, disposable table covers, and so on. It’s opaque, so I tend to use it to make copies of existing pattern piece — something I’ve done pretty regularly as I’ve lost weight and needed to adjust my slopers. I also use this when I decide I would like to take an existing t-shirt pattern and make it into a tunic or dress, for example — bigger alterations to existing patterns where I want to preserve the original pattern.

So, first I measure the pattern tissue at certain key points — in this case, the waistline, but I also measured hips. On most commercial patterns, the hip line will be 9″ below the waist line, so even if it is not marked, you can still estimate where the hip will be. (In my case, I measure the hip around 7-8″ below the waist because I am petite.) In this case, the hip was a good measurement for my body, but the waist was pretty big.

001

The smallest waist measurement for this particular skirt back piece was 9.5″. This piece is cut on the fold, as is the front piece. So, we subtract the 5/8″ at the seam allowance from the 9.5″ (9.5 – 0.625 = 8.875) and then double the answer because this piece is cut on the fold (8.875 x 2 = 17.75). The finished back piece will thus measure 17.75″ across the waist. The front piece was identical, meaning the finished waist would have measure 35.5″ wide.

Yikes.

This is where a bit of self-awareness comes in, but first we have to talk about ease. “Ease” is the word we use to describe the difference between body measurements and garment measurements. Positive ease means that the garment is larger than the body. Negative ease means that the garment is smaller than the body (often found in knitted garments). Wearing ease is the standard amount of positive ease that will make a garment fit comfortably at key measurement points, such as waist and bust — the measurements printed on the pattern envelope are places where ease is measured routinely. Then there is design ease, which is what the designer adds or subtracts to make the garment look a certain way. Cigarette pants have minimal design ease through the legs, and palazzo pants have a ton of design ease in the same place, which is why the two kinds of pants look so different. Also, woven fabrics will need more ease than knitted garments because knitted garments will stretch and move with the body in ways that woven fabrics will not.

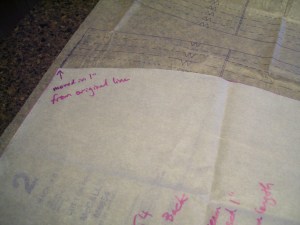
So. I know that for me, my waist measurement is just a notch over 29″ right now. And I know that with an elastic waistband, I measure the elastic piece to have an inch of negative ease, so about 28″ once it is lapped and sewn. This is the self-awareness part — I know that anything bigger than that, in an elastic waistband, will feel droopy to me and I’ll spend the day tugging on my waistband. The waist on that pattern measures to 35.5″, and I would want to use elastic to draw in 7.5″ of that, which seemed like a lot to me. I don’t like the way a very gathered waist looks on my body — dirndls are just godawful hideous on me these days. So I knew I wanted to remove some of that excess, and I started by marking a point 1″ in on the side seams at the waist on the pattern piece. Then I used my drafting ruler to draw a new curve from that point to the hip.

005

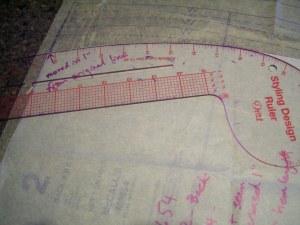
I also marked the alteration on the pattern piece, only because I know from experience that I can never remember what I did.

002

And that’s it. That 1″ adjustment on the front and back pieces removed 4″ from the waist, reducing it from 35.5″ finished to 31.5″ finished measure. I still used the 28″ waistband elastic finished measurement, so that meant the waistband was gathered slightly but not much. I also trimmed a bit off the waistband pattern piece, which was a plain rectangle with no waist shaping, so this meant simply hacking off four inches there, too, without worrying about waistband shaping.

This particular alteration is among the easiest to make, and I make it as a matter of routine on my skirt and pant waistbands.

Theresa

The 90-minute skirt

I recently pulled on my go-to black skirt, only to discover it is entirely too big to wear. I should have realized this before I even tried to wear it — it’s a thrifted Banana Republic cotton sateen skirt in a size 10 rtw, and I’m currently wearing a size 6 for most rtw skirts. In fact, during my last shopping excursion, I even had to try on some 4s, though I ended up not buying any of them. In any case, into the donation bag went my size 10 black skirt, with my heartfelt thanks that it saw me through several months of dieting for a mere four dollars. I’ve bought very little clothing as I dieted, but that skirt was a real lifesaver on several occasions. Sometimes you just have to trade the running tights and yoga pants for something a little more polished, right?

So the upshot is, I needed a new all-purpose black skirt, and found a length of heavy cotton black ribbing in my stash. This fabric has been around long enough that I can no longer remember where I purchased it, but my best guess is Vogue Fabrics. I have a hazy memory of fingering some ribbed knits there some time ago.

Knits are a good choice for the moment. I’m about 8 pounds from goal weight — close enough to sew in my goal size, far enough that fit might change just a little bit between now and goal. But knits are pretty forgiving in the fit department, and a simple knit skirt with an elastic waistband will be easy enough to alter later, should the need arise.

I just happened to have this McCall’s pattern on hand for just such a skirt project. I chose View B, a straight-ish skirt with a 21″ length.

mccalls6654

The only pattern alteration was to the waistband. I removed 4″ from the waist by tapering the pattern in one inch on either side from hip to waist, front and back. I did this to remove bulk from the waist area — this is a heavy ribbed fabric, and nobody likes the feeling of a lot of bulky fabric bunched up around the waist, right? Even so, there is plenty of room in the waist area, and I suspect I will use this modification even with lighter weight knits. (For a step-by-step of this super easy alteration, see this post.)

I chose to use a twin-needle topstitched hem, which is a little sporty, but this is a casual skirt so it works just fine. This is a little tricky to photograph on black fabric, but this picture kinda sorta shows the effect of the topstitched hem.

007

An unpressed hem! The horror!

From start to finish — cutting, stitching, fitting, and finishing — this skirt took an hour and a half. Nothing to it, really. I can already tell this will be one of those skirts I wear over and over in the fall: skirt, tights, boots, sweater, mix and match and repeat. It’s super comfortable and warm enough for a crisp fall day.

008

Not much hanger appeal! But I’m too lazy today to put on makeup and do the right sort of modeled pictures. Sorry! You can see from this picture that the waistband is pretty gathered despite the fact that I removed four inches from the waist. I’m so glad I did that. Can you imagine how gathered that would have to be with four more inches of fabric? This is why, before I cut any pattern, I measure the pattern pieces at the cross-back, bust, waist, hips, and length. These simple checks can help me tailor the garment on paper before my scissors get anywhere near the cloth. It’s surprising how often I have to reduce the waist on paper. My waist isn’t all that small, but I guess it’s smaller than the pattern companies expect it to be.

Do you do most of your fitting on the pattern or on the garment?

Theresa


The final cutting … for now

I bought a length of really excellent flannel from The Needle Shop a couple of years ago.Really excellent flannel is such a rarity these days that even the highly knowledgeable seamstresses at Sewing Pattern Review recently had a discussion about this. There are a few sources, but really, good flannel is hard to find. This is why, when I spotted this superior bolt, I bought two and a half yards without even pausing to consider what I would do with it.

And I wasn’t entirely sure what I would do with it — the pattern is a little busy, but not dreadfully so. The gray and red is one of my favorite color combinations, so I knew I would come up with something. At first, I was leaning toward a standard shirt with placket and cuff sleeves, a yoke cut on the bias — your basic lumberjack shirt. But then it let me know it would rather be a nightgown. My house is always cold at night in the winter, and a warm flannel nightgown is always a good thing.

001

Cutting in progress

I’m using McCall’s 6249, which also provided me with my go-to pajama pants pattern. I spent a whole entire dollar on this pattern at a JoAnn’s sale, and it is proving to be a dollar well spent.

McCalls6249

Unfortunately, this pattern is out of print, and I have it in the size 14-20. So I have to make the nightgown in a 14, which is a touch big, but it will have to do. For the pajama pants, I regraded the pattern to make it narrower. But after measuring the nightgown and comparing it to some sleep tees in my drawer, I decided to leave it alone. It will be big, but it will be dramatically smaller than the only other flannel nightgown currently in my drawers, a size XL bought last winter when I was around 50 pounds heavier than my current weight. This new one will be a huge improvement, and the old one is in great shape and will benefit someone at the charity thrift shop.

I’ve spent a lot of time cutting and working on a test knit, less time sewing, but I will have two FOs to show you before the week is out.

What is your go-to source for good flannel?

Theresa

Cut-a-palooza continues with a Missoni-esque knitted dress

I’m in cutting mode right now, a mode I try to visit only occasionally because of the way it converts my eat-in kitchen into a disaster zone. I use a large counter for my actual cutting — the large Olfa cutting mat fits on it with about four inches to spare in width, and about five feet of extra length, so it’s a very convenient cutting surface.

At the moment, my kitchen table is piled with fabrics and patterns. The fabrics have all been prepped and are ready to cut. The patterns, I’m prepping one by one as I cut them. First, I always make a paper tracing of the pattern pieces, leaving the original pattern intact. Then I make any alterations on the paper copies, and after I finish the garment, I sometimes transfer these altered paper copies to a gridded pellon, the type that quilters use with the 1″ grid printed in blue. That final pellon is for patterns I’m likely to make several times. The pellon holds up well to abuse, much better than any paper I’ve used.

010

I am in the process of cutting this glorious rayon textured knit. In the store (Vogue Fabrics in Evanston), the sign mentioned Missoni, but this fabric was only $18 a yard. I’ve seen real Missoni bolt ends in Haberman’s (Detroit) and in the New York garment district, and I’ve never seen them retail for under $80 a yard before now, and usually much more than that. So either Vogue was giving us a smashing good deal, or this fabric might be leftover from the Missoni-Target partnership, or the store sign meant that it looked like Missoni rather than actually was Missoni. Regardless, it is a luscious textured fabric shot through with many colors, and it is going to make a fantastic dress.

I’m sort of frankenpatterning this one (McCall’s 6612) — using the cowl from the maxidress version (view D), the sleeves from the ruched version (view A), and the just-at-knee length from the plain version (view C).  This will make more sense if we look at the line drawings.

mccalls6612line

Is it a frankenpattern if we combine different views of the same pattern?

I didn’t have to alter this pattern much. This is a multisize pattern, so instead of doing the FBA to the size 12 front, I just extended to the size 16 from the lowest point of the armscye to just above the waist, on the front piece only. That’s the beauty of multi-sized patterns. Then, for the sleeves, I measure the armscyes on the front and back pieces, and picked a sleeve with a cap measuring a little more than an inch longer than the armscye. This will give me some ease through the sleeve cap, which I might have lost if I’d just cut the size twelve sleeve as-is after altering the bust.

This dress only has four pieces — front, back, cowl, and sleeves — and I expect it will cut and sew very quickly. And I think I might have enough fabric leftover to make a tee, though I’m not sure I really need two garments in this fabric. It might just go back into the stash until later, when I’m tired of the dress but still in love with the textile.

Am I the only one who overbuys fabric just because it’s gorgeous?

Theresa


A Tale of Two Skirt Cuttings

In between sessions working on a test knit, I’ve been doing some cutting. I tend to do my project steps in batches — a lot of cutting one day, a lot of stitching, then a lot of pressing. When I’m stitching, I like to choose several projects that all use the same color thread and sew them all at once. This allows me to sit at the machine for a longer stretch and sew more seams at once before switching to the pressing board. I find it an efficient way to work.

So right now, I’m cutting. I started with two skirts. I started with a heavy cotton ponte knit from Mood Fabrics for a Katherine Tilton Vogue 8837 skirt pattern. This is a lovely heavy ponte with minimal stretch, a smooth hand, and some textural interest in the surface. (Some of you might recall, I blogged about it when it first arrived from Mood.) I’ve hunted their website for this fabric in other colors, but I cannot find it. Too bad, because I have enough of it left over to work a color-blocked dress, and it would be perfect.

008

It was the best of fabrics…

You can see in the pattern envelope photo that this skirt has a shirt-tail hem. That, plus the topstitching and shaped waistband, were what attracted me to this pattern. However, the skirt length is 33″, which is almost maxi length on my 5’3″ body. So I shortened it eight inches. I wanted it to hit just below the knee at the bottom hem and to reveal my knee through the shaped sides. Cutting this fabric was slightly challenging because it is heavy weight. It tended to fold between my shear blades rather than cutting, and my rotary cutter couldn’t always make it through both thicknesses. So I used the rotary cutter twice on each cut, then used the shears to clean up any bits the rotary blade couldn’t quite manage. It wasn’t difficult, and it didn’t change my opinion of the fabric. It is a lovely fabric.

I wish the same could be said for the other skirt fabric to become view A of McCall’s 5523, a straight skirt with some back hem detailing, in this case, an inset flounce.. This one is a wool crepe that shreds along cut edges like you wouldn’t believe. Check this out — this is what was on my cutting mat after cutting one single measly line.

004

It was the worst of fabrics…

Can you see all that debris? The fabric was disintegrating with every touch. I paid a lot of money for it, too, which irritates me now that I see how it is behaving. I bought it from a sewing expo vendor that I won’t name, but if you’ve ever been subjected to high-pressure sales tactics from an international garment fabric vendor at a traveling sewing expo, you’ll know exactly the vendor I mean. I’ve bought some linen from them in the past, and it was a very high-grade fabric. But this stuff is anything but high-grade. I’m going to have to very, very carefully overcast every raw edge before I try to do any real sewing on this project. Otherwise, the fabric is likely to dissolve along the seam lines as I stitch it. Really disappointed in this fabric.

What makes it a little more annoying is that I bought it to match a silk crepe I bought at Fishman’s. It’s a really lovely crepe, and I wanted to match the dark gray in it, so I took a swatch to the sewing expo and hunted for a nice wool to make this skirt. The man in that booth talked me into this shade of dark blue instead of a gray — none of their grays were a good match, and he wasn’t about to let me leave his booth without spending money. He kept moving the bolt and my swatch under a different light and insisting that they matched — well, they did match, but only when they were under that particular light. Look at them together now in normal daylight with a bit of can lighting.

006

It’s not dreadful, but one is clearly gray and the other is clearly blue. I’m debating whether I can wear these together. It’s pretty close, just not quite right.

What do you guys think? Close enough? Or not?

Theresa

Shh! It’s a secret!

We’ve had an inadvertent blog silence over the last few days. My bad! This is due primarily to a test knit I’m doing, one which I’m not at liberty to show you. But I can tell you it’s a garment, and I’m using this yarn:

red-gray Schaeffer Anne

That is Schaefer Anne (ravlink), a discontinued light fingering mohair/merino blend. There have been numerous problems with this yarn bleeding, and it felts if you breathe damply on it, but neither of those issues will matter a whit to this project. I look forward to being able to share more with you about this eventually, but for now, that’s as much as I can say!

I’ve done some little test knits and sample knits in the past, but this one feels special somehow. Very rarely, I browse the ravelry groups of test knitters, and even more rarely, I see something I would like to knit. I’m primarily a sweater and sock knitter, with an occasional scarf or shawl here or there, and that leaves out a lot of potential knits: baby items, blankets, toys, dish cloths, hats (I knit them, but right now, I’m bored with them), gloves and mittens (not a fan — prefer leather gloves with a thinsulate lining), bags, ponchos, and so on. For most knitters, those smaller items are standard knitting. But I’m more a sweater and sock girl.

And even there, I tend to rule out a lot of possible patterns on design features. Socks, to me, are mindless knitting, and I’m happy to keep it that way. I knit two kinds of socks: with a 7″ or thereabouts ribbed leg that can be folded down into a cuff, or footies like these pink heathered shorties with no leg at all. I keep a sock-in-progress in my purse always, as my emergency “I can’t believe I’m stuck in this waiting room” knitting.

For sweaters, there are a lot of design elements I shy away from. I prefer a close fit at the armscye, so this rules out a lot of circular yokes, dolman sleeves, dropped sleeves, and similar shapes. A round yoke or raglan yoke will make my shoulders look narrower and more sloped than they already are — and really, I don’t need to accentuate my narrow, slightly sloped shoulders. Almost every sweater I knit has either a set-in sleeve or a saddle sleeve, which I automatically modify to get better seamlines at the armscye.

All of this is to say, I scan the test knitting groups, but I don’t usually expect to find patterns I want to test. So when I saw this particular one and gasped aloud at how cool it is, I volunteered on the spot. It shouldn’t take long to knit, but I won’t be able to show you project pics as this one is on the needles, and maybe not until much later, when it is eventually released.

Have you ever done any pattern testing? Did you enjoy the process?

Theresa


An End to Whimsy

004

I keep a lookbook, a binder of pictures from magazines and fashion websites containing things I would like to make and wear. In fact, the criteria for my lookbook is exactly that: Would I make it? Would I wear it in real life? I might buy instead of making, but if it isn’t something I find interesting enough and pretty enough to make, it doesn’t go into the book. It’s got to be worth either the time (making) or the money (shopping) in order to qualify.

My lookbook pictures have notes scribbled on them to remind me why I included them. In the picture above, on the left page, the note mentions the placement of the gores on the Vince Camuto skirt. On the right page, the note is about the way the waistband, hem flounce, and waterfall flounce are colorblocked. The loose page above, awaiting notation and filing in the proper section of the binder, is going to include a note about the combination of red boots and purple jacket — not a combination I’ve worn before, but it works here because of the very casual nature of the clothing. Also, red boots. Want.

This might seem like a waste of time, but it’s actually been a hugely helpful process. I have a real wardrobe dilemma on my hands right now. The summary version of that dilemma can be broken down like this:

  • I own almost no clothing that fits, after dropping from a 22 to a 6/8 rtw.
  • I have a decent clothing budget, but I need so much that it cannot possibly be enough.
  • While I was busy being sick and gaining and losing all that weight, the cut and styles of clothing changed enough that I can’t always judge how something will look on me just from eyeballing it. This inability to predict means I have to try on everything, all the time, and am frequently surprised by the results.
  • I got used to dressing a heavy body, and the clothing is dramatically different in plus sizes than in regular sizes. What worked in a 22 absolutely does not work in a 6/8.

That last point is the real tipping point that turns the fun of shopping for a new wardrobe into a confusing and sometimes frustrating experience. I blogged about this before with the blue mullet skirt. This skirt is a shrunken-down clone of a red skirt I wore the crap out of when I was a 22. It looked great on me then. Looks sort of shapeless and lumpy on me now. That skirt taught me an important lesson: all my dressing preferences for the heavy body are done and over with. I can’t rely on any ideas I used when dressing in a 22.

One of the weird things about plus-sized clothing is that it doesn’t rely on style lines the same way regular sizes can. The majority of shirts, for example, are all cut basically the same way — no waist, boxy body shaping, deep armholes, floating hems — to accommodate the needs of a larger body. Instead of creating a sense of style through style lines, these garments rely on things like color, pattern, and maybe a bit of embellishment. This is why so many things in the plus size department are bedazzled, sequined, beaded, or look rather like a muumuu. When you can’t manipulate style lines, these are the details left to manipulate.

Which brings me to whimsy. I’ve never been a native fan of whimsy as a style mode, though I can certainly appreciate it on other people. But it’s just not something that ever felt like it was generated from my personal preferences, more like something I fell into because plus-size dressing is limited in options. I bought a few whimsical pieces because they were available, and they were at least interesting, which is more than can be said for a lot of plus wear. Add into that the fact that I have a friend who is so deep into whimsy as a style mode that she sort of pushes it on everyone without probably even realizing she does it. I’ve been fabric shopping with her a couple of times, and I always ended up buying whimsical prints while under her influence. This is not to say it’s her fault — it’s not. It’s more like one of the factors that led to me buying fabric such as this.

006

That would be a hot pink quilting cotton printed with white daisies. I no longer remember which quilt shop supplied it, but I know I was shopping with my whimsical friend at the time because those are the only fabric stores she will visit. I have zero interest in quilting and would never shop in those places otherwise, even though they’re stuffed with inventive, fun prints. But because we went shopping together a few times, I have a couple of other quilting cottons with similarly whimsical prints, two of which have already been made into pajama pants (here and here), and two which are casual summer skirts (here and here). Of those finished garments, the black and white floral Ungaro-inspired flounced skirt is the one that is most native to my natural style in a normal size. The pajama pants — well, it’s fine to get a little crazy with a print there and use something you might not wear out of the house. That’s why the pink daisy stuff, which I’d originally thought would make a fun casual summer skirt or shirt, will now be another pair of pajama pants. Whimsy might have felt adventurous when I was a 22 rtw, but now it just feels out of step with my style.

While I was at it, prepping and cutting this fabric, I pulled out all the other whimsical prints I’d picked up when plus-sized and shopping with my whimsical friend. One of those prints will be a fourth and final pair of pajama pants — really, four is enough — and some will be made into project bags. The rest went into the donation pile. Letting go of those prints feels a bit like letting go of my make-do mentality, familiar to many people uncomfortable in their bodies. You don’t shop for pleasure or for a sense that you can make yourself look good. You shop out of necessity, and the only goal is to find something that doesn’t look straight-up horrid. Lack of revulsion was the same as approval when approval was out of reach.

Now when I shop, I am rediscovering the idea that I can pick and choose among several options. I don’t have to buy something just because it fits and isn’t revolting. I can find things I like, that fit well and look great, and reject all the other “almost but not quite” pieces. This is liberating, and the lookbook helps a lot with controlling that process. By focusing on the things I like, and the reasons I like them, I’m a more discerning shopper when I hit the stores. It’s not just about identifying trends. It’s about identifying a style that will work for me on this body.

How has your style evolved over time? What made it evolve?

Theresa